

That’s what drove me to develop Dex’s Power Grid.
Tested on English versions of After Effects CC 2023, 2024. Windows 10, Windows 11 and MacOS.

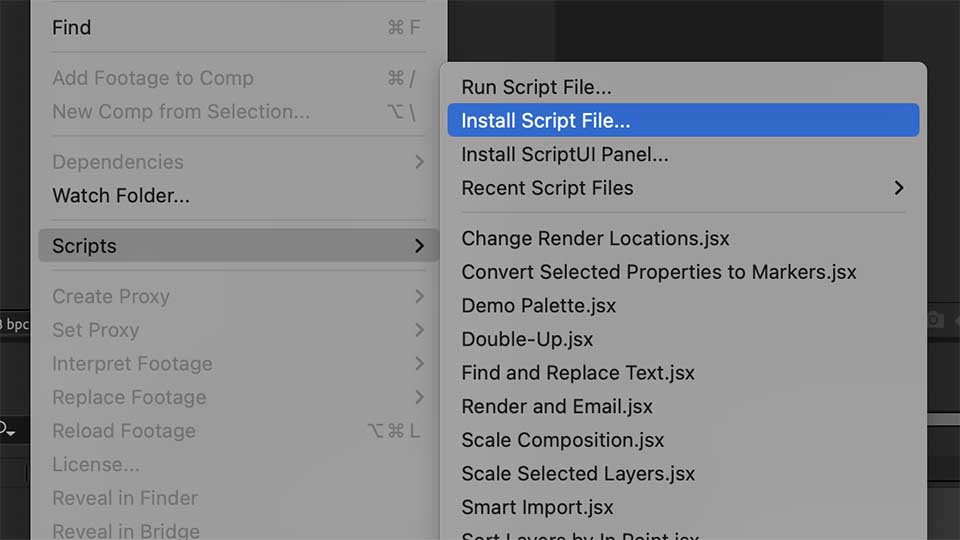
In After Effects, from the File menu select Scripts and Install Script File. Navigate to the script file. Restart After Effects and Dex’s Simple Grid will appear in the script list.

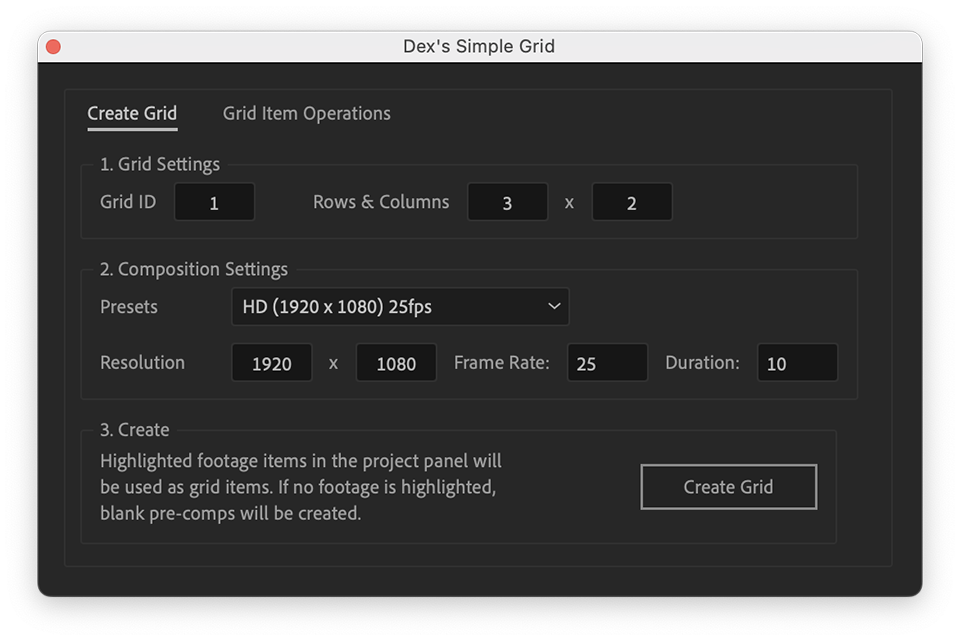
Grid ID
Each grid in your project needs a unique numeric ID here. Set that here.
Rows & Columns
This is self-explanatory, but you can alter these values in a control layer in each grid composition later, so don’t feel bound by them.
Composition Settings
All self-explanatory. As with the Rows and Columns, these values can be altered later.

Grid Item Operations are helpful should you make resolution changes, row and column changes, grid composition resolution changes, duration changes or frame-rate changes.
Grid ID: You must ensure that you have the grid ID on which you want to use these operations in this box.
Resize
If you need to add a new row to your grid, the aspect ratio of each item may change. If so, all the pre-comped composition sizes will need to be changed, too. Click this button to do that. Only the first layer in the pre-comped image will be resized.
Match Duration
If you change the grid comp’s duration, especially if you lengthen it, this button will change each pre-comped composition to match.
Match Frame-Rate
If you change the grid comp’s frame rate, this button will change each pre-comped composition to match.
DO NOT rename the comps the script creates. The script code won’t work if you do! You can reorganise them in your project, but don’t rename them.
Dex’s Power Script may display an error while generating a grid. This error should disappear.
Power Grid creates grids in a 2D plane. But you can apply the 3D layer option and move grid elements in z-space (x and y remain fixed).
Ensure you have the right grid ID in the grid ID text box.
This script is provided “as is.” I’m not a professional coder or After Effects script writer. I have tried to make creating a grid as straightforward as possible – I’ve used it in the heat of a client job – but if you have any suggestions, let me know.

Podcast editing takes time. In my case, two podcast edits per interview took between 12 and 16 hours. Translated to my typical 8-hour working day, that’s between 1.5 and 2 days.
Before making a single cut, transcribe the entire podcast recording. There are many transcription services, but transcription is built into Premiere Pro if you’re a Creative Cloud user. It’s called Speech to Text, and it’s available in the latest version of Premiere:
https://helpx.adobe.com/uk/premiere-pro/using/speech-to-text.html
Printing out the recording is not mandatory, but it makes it much easier to make notes. And you will need to make notes. I didn’t make notes for the first couple of podcasts I cut. It made the process much more complicated, with a lot of back and forth in the timeline, trying to remember where things were.
With transcription in hand, listen to the entire recording from start to finish. The first thing to do in this paper edit is to identify any unnecessary content. People love going off on tangents and talking in metaphors that don’t add value to the discussion. Mark all that stuff for deletion. And because this is a paper edit, you’ll know roughly where to find it if you delete something you might want later.
The paper edit will also highlight sections that may work better elsewhere in the edit.
Begin the editing process by applying your notes from the paper edit. As you cut, remove long pauses, filler words and ums and ahs. Some people use filler words (such as “you know” and “right?”) that aren’t noticeable under normal conversational conditions but leap out when heard in a recording. You want to remove those. If they annoy you in the edit, they will be infuriating for the end listener. I stop listening to podcasts if there are annoying repeating speech patterns.
For any video editor working with sound, this is obvious. However, if you’re dealing with poor recordings with vastly different levels between interviewer and interviewee, Adobe Audition’s Speech Volume Leveller filter is a lifesaver. The filter does exactly what it says on the tin. It levels everything … even background sounds, so be aware of that.
Once you’ve completed the initial edit, take the time to review the podcast and refine it further. Listen for any areas that need additional editing, such as repetitive content or unclear points.
Going into the job, I knew I should use Adobe Audition, but after a frustrating hour wrestling with it, I decided to go with what I was familiar with. Premiere. It was a mistake. I was making a lot of cuts with the edit, and the process was becoming laborious in Premiere. I decided to return to Audition, stop wrestling with it, and just flow until I reached a zen-like state.